


Photo by Hitesh Choudhary on Unsplash
How I created a blog site with Flask Python framework
Join me as I walk you through how I made this simple yet fully responsive blog site with Flask Python framework, Jinja templates, and SQLAlchemy.


Introduction
Why Flask?
Before I start, I'd like to shine the spotlight on what exactly we will be using: Flask. A lot of people see flask as a puny version of the Django framework because of the word "micro". I don't know much about Django yet, but one thing is sure, Flask is awesome for web development. I have taken key points from the definition of Flask via Wikipedia.
Flask is a micro web framework written in Python. It is classified as a microframework because it does not require particular tools or libraries. It has no database abstraction layer, form validation, or any other components where pre-existing third-party libraries provide common functions. However, Flask supports extensions that can add application features as if they were implemented in Flask itself. Extensions exist for object-relational mappers, form validation, upload handling, various open authentication technologies and, several common framework related tools.
Simply put the Flask framework is lightweight, yet it can integrate numerous features. This is why I'm going to show you how easy it is to create a Blog with flask.
Pre-requisites
Some concepts I will be referring to here are not for newbies in programming (though I am a newbie myself), which is why I will be dropping links to articles and videos that helped me understand. But you must have some basic knowledge of the following.
Python basics (string manipulation, loops, lists, etc.)
Using a Bash terminal or command prompt
Virtual environments
Using a code editor (either of VScode, Pycharm, Emacs, or Vim) I'll be using PyCharm
HTML and CSS
[ptional] Databae queries
[Optional] Git and Github (for version control)
What we want to build
We will be keeping it simple, a blogging app with user registration, login, and logout, contact page, and about-us page, where a user can make articles CRUD (Create, Restore, Update and Delete) functionality, backend SQLAlchemy database which we will use to store our user, article, and contact details, and a snazzy fronted where the articles and other database data will be displayed.
Now for the name and aim of this blog, I was feeling a bit patriotic so I decide to make a blog for Flask developers to share code and ideas. I called it Flasketeers (named after the Three Musketeers)... not my most creative moment 🤦♂️. But you can name yours whatever you want
Let's code!

Setting up the project
Keeping all files and folders on the system well-structured is an excellent practice. We will set up a special folder on the computer for this blog project. We may accomplish this using the Bash terminal, PyCharm, or VsCode. Using Flasketeers as an example, below is the terminal script to make a new folder and then move inside it.
COPY
$ mkdir Flasketeer
$ cd Flasketeer
Creating the virtual environment
I'd like to think of virtual environments as a way to isolate a project from your system, let's say we are building a project and we need to install a package for it, but we also have an older or similar package already installed on our system, we would want to delete or change our systems dependencies for just one project, would we? So virtual environments let us install a specific package only for whatever is in that environment.
Let's create our virtual environment and call it env
$ python3 -m venv env
Now we've created the environment but it still needs to be activated
$ source env/bin/activate
Now notice how the prompt (The first line of words that end with the $ sign) has changed. It means we are in our virtual environment, but always deactivate it when done with $ deactivate
Pip
Pip is a package installer for python, it is a recursive acronym that stands for 'Pip Installs Packages'.
So the first package we should install is flask so to do that we type:
COPY
$ pip install Flask
Now that we have installed Flask in our virtual environment, the next thing to do is to create a configuration file for our flask app.
Creating the Flask App
We will first create a hidden file (hidden files always start with a dot '.' and are ignored in the directory listing) called .flaskenv within the home directory of the project. This hidden file enables us to launch the blog with a flask run command in the terminal:
FLASK_ENV = development
FLASK_DEBUG = 1
FLASK_APP = app.py
These statements have been used to inform the computer that:
This Flask app should be run on a development server (localhost)
We are willing to troubleshoot the Flask application live which means whenever we save our work, it automatically updates without us having to restart the server (1 is "True" in Boolean)
app.pyshould be recognized by Flask as the primary Flask app file for this project.
now we can choose to put all our code into the app.py file but it is preferable to divide the code we will have in app.py into several Python files that perform distinct functions. So what we want instead is a folder that contains the different functions that we need then a file run.py simply imports that folder and runs the application.
Now inside our project folder, we create that folder that will contain the different functions, let's call it main
$ mkdir main
$ cd main
But we can't just import our main folder, we have to add a file to it called __init__.py (stands for __initialization__.py) Basically, __init__.py makes python treat the directory where it's located as a package. We can also add code to our __init__.py file which will be executed first when the directory is imported. more info
So Inside main we create __init__.py and add the following code which will be initialized with it
from flask import Flask

app = Flask(__name__)
app.app_context().push()
In the above code, we import the Flask initializer from the flask module. Initializing the name of our file ( __name__ represents the name of the current file ), and we reference our new flask instance with app . Running app.app_context().push() prevents circular import issues when you import an instance within a module. more info
Now we create run.py (the file that simply imports main) within the project's home directory, then write this code within:
from main import app
if __name__ == '__main__':
    app.run(debug=True)
This simply runs the Flask instance app we imported from main in debug mode. The line if __name__ == '__main__': allows you to execute code when the file runs as a script, but not when It’s Imported as a module. more info
Preparing the Database
Our blog's article details, user details, and other data must be saved someplace. This is where a database comes in, since it stores all of the necessary information in conveniently accessible and persistent tables. We will be using SQLAlchemy to retrieve and insert data into our database.
The video clearly explains SQLAlchemy in
under 7 minutes
So now that you understand let's start by setting up SQLAlchemy
Installation
We will first install Flask-SQLAlchemy with the following terminal code:
$ pip install Flask-SQLAlchemy
Imports
We will now return to __init__.py to import the inbuilt os module for configuration purposes, and the SQLAlchemy class for manipulating our database. Our Python file should look like this by now:
from flask import Flask
from flask_sqlalchemy import SQLAlchemy
import os

app = Flask(__name__)
Configuration
In this step, we will configure a path for our SQLite database file. We will use some functions from the os module (urandom) to generate a random secret key for encryption purposes. We will then turn off modification tracking (Track any commit or change made on the database) to use less memory.
app.config['SQLALCHEMY_DATABASE_URI'] = 'sqlite:///flasketeer.db'
app.config['SECRET_KEY'] = os.urandom(24)
app.config["SQLALCHEMY_TRACK_MODIFICATIONS"] = False
The secret key is an important security feature. It is standard practice to create a complex hexadecimal string for each project and hide it from the public. It is bad practice to manually input a secret key
Instantiation
We will create a database object using the SQLAlchemy class, passing the app instance to connect our Flask app with SQLAlchemy. We will store this database object in a variable called db. We will then use this db object to interact with our database.
db = SQLAlchemy(app)
db.init_app(app)
We now have our database configured. Time to prepare the tables within.
Table Creation
To store our data we need to create Data models.
An SQL database data model is an abstract representation of data stored in an underlying relational database or other data source that can be accessed through JDBC. SQL database data models consist of SQL database data sources, SQL database data types, and SQL database data items.
Simply put a data model is the structure we use to store our data. Think of it like your normal SQL table.
Now we create a file models.py in our main folder that will create and store our project data with three database models: User, Post and Contact.
User Model
Our
Usermodel creates a table of users using UserMixin, links each user to their articles in the table, and then returns the username as its representation.To have access to
UserMixin, we will first installFlask-Loginin the terminal:$ pip install Flask-LoginNext, we will import the
UserMixinsubclass from theFlask-Loginmodule:from flask_login import UserMixinWe can now build the
Userclass using the following code:class Users(db.Model, UserMixin): __tablename__ = 'users' id = db.Column(db.Integer(), primary_key=True) username = db.Column(db.String(length=30), nullable=False, unique=True) email_address = db.Column(db.String(length=30), nullable=False, unique=True) firstname = db.Column(db.String(length=30), nullable=False) lastname = db.Column(db.String(length=30), nullable=False) password_hash = db.Column(db.String(length=60), nullable=False, unique=True) articles_by = db.relationship("Posts", back_populates="created_by", lazy="dynamic") def __repr__(self): return f'User {self.username}'I basically just created six tables for the user id, username, email address, first name, last name, user password, and articles made by the user.
db.Column()create the table column,db.String()anddb.Integer()indicate that the column should contain only strings and integers respectively. Thelengthparameter sets the maximum string length,nullableindicates if the field can be left empty.Post Model
The
Postmodel creates a table of articles, links each article to its author, and then returns the article's title as its representation.To be able to show the day each entry was posted, we will need to import from the
datetimemodule that comes with Python:from datetime import datetimeThe rest of the syntax is similar to that of the previous table, as seen below:
 class Posts(db.Model, UserMixin):
     __tablename__ = "posts"
     id = db.Column(db.Integer, primary_key=True)
     post_title = db.Column(db.String(80), nullable=False)
     post_content = db.Column(db.String, nullable=False)
     post_image = db.Column(db.String, nullable=False, default='python_coding.jpg')
     created_on = db.Column(db.DateTime, default=datetime.now())
     user_id = db.Column(db.Integer, db.ForeignKey("users.id"), unique=False, nullable=False)
     author = db.Column(db.String, nullable=False)
     created_by = db.relationship("Users", back_populates="articles_by")
Contact Model
The
Contactmodel creates a table of contact-us messages from site visitorsclass Contact(db.Model, UserMixin): __tablename__ = 'contact' id = db.Column(db.Integer(), primary_key=True) name = db.Column(db.String(length=30), nullable=False) email_address = db.Column(db.String(length=30), nullable=False, unique=True) subject = db.Column(db.String(length=80), nullable=False) message = db.Column(db.String(), nullable=False, unique=True)
Initialization
The following syntax ensures that a database file (by the name we have assigned during configuration) is created the first time a route is requested in this Flask app, only that first time, and only if the flasketeer.db file does not already exist:
@app.before_first_request
def create_tables():
    db.create_all()
When we use flask run in the terminal, a flasketeer.db file will appear in the project's root directory if none previously existed. We can then use DB Browser for SQLite to see what is happening within the database.
Design Basic Routes
Routing is the process of assigning a URL to a particular Flask function that will be responsible for handling its logic. The route() decorator in Flask is used for routing, and it receives the URL as an input. In this tutorial, @app.route() will be used.
Since we want to keep things basic right now, we'll start with the routes that give the blog life and make it accessible. We first create a routes.py file in our main folder then Then, after adding a few imports from Flask, we will have the following expression for the Flask imports line:
from flask import Flask, flash, render_template, url_for, request, redirect
As we walk through their use cases, these imports will gradually become more apparent.
Homepage
The index is the first page that pops up when a user visits a site. Index route is always represented with just '/' in routing. Since this is the homepage of a blog, we will make an index() function to display all articles.
@app.route('/')
def index():
    articles = Article.query.all()
    context = {
        "articles": articles
    }
    return render_template('index.html', **context)
Here, we have gotten all of the blog's articles by querying the Article model in our database. The **context keyword argument then tells Flask the variables to use when rendering the index.html template. See more details about rendering templates explained by Flask Docs.
About
This simple function renders the about.html template as a webpage which tells the visitor about the blog site and its creator.
@app.route('/about')
def about():
    return render_template('about.html')
Contact
Our contact() function collects feedback from users via a form in the contact.html template, stores it on the "contact" table in the database using the Contact model, and then redirects to the homepage after flashing a success message.
@app.route('/contact', methods=['GET', 'POST'])
def contact_page():
    form = ContactForm()
    if form.validate_on_submit():
        message_to_store = Contact(name=form.name.data,
                                   email_address=form.email_address.data,
                                   subject=form.subject.data,
                                   message=form.message.data)
        db.session.add(message_to_store)
        db.session.commit()
        flash('Your message has been successfully sent', category='success')
        return redirect(url_for('home_page'))
    if form.errors != {}:
        for err_msg in form.errors.values():
            flash(f'There was an error sending your message: {err_msg}', category='danger')
    return render_template('contact.html', form=form)
Note: The 'GET' method gets data from the backend to display to users, while the 'POST' method allows a user to post data to the backend. 'GET' is the default routing method, so it does not need to be passed as an argument when no other method is used. Read more about routing and its various methods on this nice article by Todd Birchard.
Note: The only way to view these messages on our blog project is with DB Browser, as sending emails with Flask is beyond the scope of this tutorial.
We have now set up the basic backend code needed to get the blog up and running. We will soon write blocks of code that will manipulate the User and Post tables, but that would be after designing the user interface.
Designing the frontend with Flask
With these two steps, we will learn the standards for creating a templates folder in Flask, practice some HTML and CSS, and learn how to manipulate HTML templates with Jinja.
Create HTML Templates, spiced with Jinja
"Jinja is a fast, expressive, extensible templating engine. Special placeholders in the template allow writing code similar to Python syntax. Then the template is passed data to render the final document." - Jinja Docs
Jinja lets us make our HTML files dynamic with syntax that resembles Python. Jinja code is written where needed within the HTML code, so it is not stored as a separate script.
We start this step by creating a templates folder within the project's main folder or root directory. This folder is a standard in Flask development, as it is from here that all HTML files used in the project will be accessed by the Flask app. For example, here is the templates folder in Ze Blog.
We will create these HTML files for the blog: base.html, index.html, about.html, contact.html, signup.html, login.html, contribute.html, edit.html and article.html.
For now, we will only fill in the first four files listed above, as we have created their relevant routes earlier in this tutorial. The remaining files are more technical and will be written along with the upcoming backend code. Let us start with base.html, then.
"The most powerful part of Jinja is template inheritance. Template inheritance allows you to build a base “skeleton” template that contains all the common elements of your site and defines blocks that child templates can override." - Jinja Docs
The base template makes use of template inheritance, a very useful shortcut provided by Jinja. In the base.html file, we can put every block of code that we would normally have to repeat in other HTML files. We will then inherit the base template into those child templates (the other HTML files) and only write the code that pertains to the functions of a particular HTML file within itself. Thus, we will adhere to the DRY principle and have a much cleaner program.
This file does the heavy lifting for the site's design, so it has some heft. Here is what was used in the sample blog: Ze Blog's base template. This tutorial assumes prior familiarity with the basics of HTML and CSS, so we will focus on Jinja here, with some code snippets taken from that sample file to illustrate certain concepts.
- Flask's url_for() Function
"Flask url_for is defined as a function that enables developers to build and generate URLs on a Flask application. As a best practice, it is the url_for function that is required to be used, as hard coding the URL in templates and view function of the Flask application tends to utilize more time during modification." - EDUCBA
<a href="{{url_for('index')}}">
  <img
    src="{{url_for('static',filename= 'static/img/flask_logo.png')}}"
    alt="Logo"
    width="120"
    height="40"
  />
</a>
In this image-adding code block, we have used url_for and Jinja syntax twice:
To create a link to the
index.htmltemplateTo create a link that instructs the interpreter to search the
staticfolder for a file with a particular name
Note: The use of double curly brackets {{ sample code }} is the default syntax for expressions in Jinja, as well as the use of quotation marks around the file/folder name with no .html in the url_for() function's argument.
User Authentication and IF Statements
<nav class="edit-nav" id="edit-nav">
                <ul>
                    <li class="edit-nav-item {% block home_active %}  {% endblock %}"><a href="{{ url_for('home_page') }}">
                        Blog Home
                    </a></li>
                    {% if current_user.is_authenticated %}
                    {% else %}
                        <li class="edit-nav-item {% block register_active %}  {% endblock %}"><a href="{{ url_for('register_page') }}"> Register </a>
                        </li>
                    {% endif %}
                    <li class="{% block login_active %}  {% endblock %}">
                        {% if current_user.is_authenticated %}
                           <a href="{{ url_for('logout_page') }}"> Logout </a>
                        {% else %}
                            <a href="{{ url_for('login_page') }}"> Login </a>
                        {% endif %}
                    </li>
                    <li class="{% block post_active %}  {% endblock %}"><a href="{{ url_for('post_page') }}">
                        Post
                    </a></li>
                    <li class="{% block about_active %}  {% endblock %}"><a href="{{ url_for('about_page') }}">
                        About Us
                    </a></li>
                    <li class="{% block contact_active %}  {% endblock %}"><a href="{{ url_for('contact_page') }}">
                        Contact Us
                    </a></li>
                </ul>
            </nav>
With current_user.is_authenticated and an IF-ELSE statement, we can ensure that only logged-in users will see a version of the navigation bar that lets them post an article or log out. Unauthorized users will see a navbar which lets them sign up or log in, but no option of contributing an article to the blog.
Note: Every statement block in Jinja must have an "end..." to close it (eg if and endif), and {% sample code %} is the default syntax for statements in Jinja.
Message Flashing and WITH Statements
Message flashing is provided by Flask as a simple way to give feedback to our users. We will explore the content of the messages when building the relevant routes, but our base template will have the following code block to allow a certain message to be printed when required:
{% with messages = get_flashed_messages() %} {% if messages %}
<div class="container">
  {% for message in messages %}
  <p>{{ message }} <a href="{{request.path}}">Dismiss</a></p>
  {% endfor %}
</div>
{% endif %} {% endwith %}
Please read more about message flashing syntax on Flask Docs, with a lot more detail available there than what the scope of this tutorial allows.
Note: {{request.path}} provides a URL which redirects to the current webpage. Thus, clicking the "Dismiss" link beside the message reloads the current page. This makes the flashed message disappear because flashed messages do not show up again after another request has been made. There are probably better ways to do this message dismissal - such as this jQuery answer on Stack Overflow - but {{request.path}} works easily enough.
Block Content
The base.html template is just a skeleton upon which every endpoint is fleshed out. With this in mind, it is easy to understand why its <main> element is not doing much, as this is where the specific job of each child template will come in. What little code we do have in the <main> element is quite important, as the {% block content %} statement allows each child template to inherit what is in base.html and avoid repetition.
<main class="container">{% block content %}{% endblock content %}</main>
That's it. Yes, really. We open a content block and then close it immediately. We will then use it for inheritance in the next step.
Note: Any code we put before and after the {% block content %}{% endblock content %} statement will apply to all child templates.
Inheritance
The index.html, about.html and contact.html files use basic HTML concepts and Jinja syntax standards that have been discussed earlier in this tutorial. Click each hyperlink to see the equivalent sample from Ze Blog.
This is the Jinja syntax for inheriting from the base template as extensions into any of the child templates:
{% extends 'base.html' %} {% block content %}
<p>Sample HTML code for the specific webpage</p>
{% endblock content %}
Beautify with CSS
Just like the templates folder in the previous step, the static folder is a standard for frontend development with Flask. A Flask project's static folder contains all assets used by the project's templates, including CSS files, JavaScript files, and images. Within the static folder, we will create a css folder, which will then have our main.css file. For this beginner-friendly project, all styling will be done within main.css.
The choice of blog design within main.css is entirely up to the programmer. There are many ways of doing this - including the popular Bootstrap styling toolkit with many handy tutorials online - but here is the simple responsive Vanilla CSS used on Flasketeer. Or you can get a template from TemplateMo
Further Preparation
With the basic frontend and backend code now covered, we will focus on the more specific functions that this blog site will be able to perform.
Note: As with previous sections of this tutorial, most of the syntax explanation for the next two major segments has been outsourced to more detailed online tutorials and official documentation, with sample code being available on my Gihtub Repo
Imports
We already have all the necessary installations, so the next step is to make a few more imports which will become clearer with their use cases. It is faster to just type them at once, so this is how the top of our Python file should now look:
# Imports: load the source packages with `pip install -r requirements.txt`
from flask import Flask, flash, render_template, url_for, request, redirect
from flask_sqlalchemy import SQLAlchemy
from werkzeug.security import generate_password_hash, check_password_hash
from flask_login import current_user, login_user, logout_user, login_required, LoginManager, UserMixin
from datetime import datetime
import os
The werkzeug.security module comes with Flask and provides password hashing for improved internet security, in case of a data breach. This means that we will never store the users' raw passwords, but rather a complex hashed form via generate_password_hash() which will only be decoded by check_password_hash() when a site visitor tries to log in.
Instantiation
To use the Flask-Login module, we pass our app as an instance of LoginManager():
COPY
COPY
login_manager = LoginManager(app)
User Management
A major function of this blog will be handling users and their data. This involves user registration and authentication. We will explore the Python code used to achieve said objectives in this section of the tutorial. To see the HTML templates used in our sample project, check out signup.html and login.html on Ze Blog.
Register a User
Our register() function collects user data from the registration form in the signup.html template. If the username is already taken, we will flash an error and reload the registration page. If the given username is available, we will add this new user's data to the "users" table in the database with a hashed password, using the User model. We will then redirect them to the login page.
@app.route('/register', methods=['GET', 'POST'])
def register_page():
    form = RegisterForm()
    if form.validate_on_submit():
        user_to_create = Users(username=form.username.data,
                               firstname=form.firstname.data,
                               lastname=form.lastname.data,
                               email_address=form.email_address.data,
                               password=form.password.data)
        db.session.add(user_to_create)
        db.session.commit()
        login_user(user_to_create)
        flash(f'Welcome to the community {user_to_create.firstname}!', category='success')
        return redirect(url_for('home_page'))
    if form.errors != {}:
        for err_msg in form.errors.values():
            flash(f'There was an error signing you up: {err_msg}', category='danger')
    return render_template('register.html', form=form)
Log a User In
The login() function checks if the user's input on the login.html form matches any username and hashed password pair on the "users" table in the database. It then redirects to the homepage if the user is successfully authenticated, but flashes an error and reloads the login page if the data is invalid.
@app.route('/login', methods=['GET', 'POST'])
def login_page():
    form = LoginForm()
    if form.validate_on_submit():
        attempted_user = Users.query.filter_by(username=form.username.data).first()
        if attempted_user and attempted_user.check_password_correctness(
                attempted_password=form.password.data
        ):
            login_user(attempted_user)
            flash(f'Success! You are logged in as: {attempted_user.username}', category='success')
            return redirect(url_for('home_page'))
        else:
            flash('Username and password do not match! Please try again', category='danger')
    return render_template('login.html', form=form)
We have now achieved user authentication, only allowing those who provide the correct name and password to be logged into the blog.
Log Out the Current User
The Flask-Login module provides an easy logout_user() function, which helps us revoke a user's access to protected routes once they click the logout link:
@app.route('/logout')
def logout_page():
    logout_user()
    flash('You have been logged out', category='info')
    articles = Posts.query.all()
    return render_template('index.html', articles=articles, preview=preview_article)
No HTML template is needed here, as the route simply logs the user out and redirects them to the homepage.
Note: For the rest of this tutorial, we will assume that a user is currently logged in.
Article Management
Another major feature of our blog will be handling articles on the site. This involves user authorization, as some features and routes should only be available to the author of the article. To see the relevant HTML templates used in our sample project, check out article.html, post.html and edit.html on Flasketeer Blog.
Display a Single Article
Let us start with an easy one. This article(id) function takes the article's ID as an argument, gets the requested article from the database, and then displays said article via the article.html template.
@app.route('/article/<int:article_id>')
def article_page(article_id):
    article = Posts.query.filter_by(id=article_id).first()
    user = Users.query.filter_by(id=article.user_id).first()
    file_url = url_for('get_file', filename=article.post_image),
    return render_template('article.html', article=article, user=user, file_url=file_url)
Just like the homepage, we do not need user authentication or authorization for this route, because every visitor to this blog will be allowed to read every article on it.
Post a New Article
A user has to be logged in to be able to post an article, as some user data is required to identify the author and later authorize them to edit or delete their articles. Only user authentication (not authorization) is needed for this step, as the protected data (article) doesn't exist until it has been created.
This is where we will use an easy authentication tool provided by Flask-Login. The @login_required decorator does all the heavy lifting for us, as it ensures that a protected page will only be rendered if the current site visitor is logged in as a user. If the visitor is not logged in, it will display an error message.
Our post_page() function will enable authenticated users to post new entries to the "articles" table in our database using the Article model, after getting relevant data from the form in post.html. We will then thank the user and redirect them to the homepage to see all articles. If the new article's title is taken, we will flash an error and reload the page instead.
@app.route('/post', methods=['GET', 'POST'])
@login_required
def post_page():
    user_id = current_user.id
    username = current_user.username
    form = PostForm()
    if form.validate_on_submit():

        if not form.post_image.data == None:
            now = datetime.datetime.now()
            new_name = str(user_id) + '_' + now.strftime('%d%m%Y%H%M%S') + '.'
            filename = photos.save(form.post_image.data, name=new_name)
        else:
            filename = 'python_coding.jpg'

        post_to_create = Posts(post_title=form.post_title.data,
                               post_content=form.post_content.data,
                               user_id=user_id,
                               post_image=filename,
                               author=username)
        db.session.add(post_to_create)
        db.session.commit()
        flash('Successfully created post!', category='success')
        return redirect(url_for('home_page'))
    if form.errors != {}:
        for err_msg in form.errors.values():
            flash(f'There was an error creating your post: {err_msg}', category='danger')

    return render_template('post.html', form=form)
User Authorization
We should only allow authorized users to manipulate the articles in our database. While creating routes for editing and deleting articles, we will practice the concept of user authorization by writing IF statements which check that the currently logged in user is a particular article's author. We will see these IF statements at work in our last two steps.
Edit an Article
The edit(id) function enables article updates by the author. It takes the article's ID as an argument, then gets the article's author from the database to compare with the logged in user's username. If these are the same, it renders the edit.html template for the user to edit their article, and then posts the user's changes to the database. The function then loads the article's page if it has been successfully edited, but flashes an error and redirects home if the user is unauthorized to make changes.
@app.route('/edit/<int:edit_id>', methods=['GET', 'POST'])
def edit_page(edit_id):
    article_to_edit = Posts.query.filter_by(id=edit_id).first()

    if current_user.username != article_to_edit.author:
        flash('You cannot delete another user\'s post!', category='info')
        return redirect(url_for('home_page'))

    form = EditForm()
    form.post_content.data = article_to_edit.post_content

    if form.validate_on_submit():
        article_to_edit.post_title = form.post_title.data
        article_to_edit.post_content = form.post_content.data
        db.session.commit()
        flash('Successfully edited your post!', category='success')
        return redirect(url_for('home_page'))
    if form.errors != {}:
        for err_msg in form.errors.values():
            flash(f'There was an error signing you up: {err_msg}', category='danger')

    return render_template('edit.html', form=form, id=edit_id, prev_article=article_to_edit)
Delete an Article
Deletion does not need an HTML file, as it is a route which does one action and then redirects home. Our delete_page(id) function enables article deletion from the database by that article's author only. Just as above, the function first queries the database for the entry whose ID matches the article ID it has received as an argument, then it checks if the current user is the author of the chosen article before executing the db.session.delete() function. We will then redirect to the homepage when the article is successfully deleted, or flash an error and redirect home if the user is unauthorized.
@app.route('/delete/<int:delete_id>/', methods=['GET'])
@login_required
def delete_page(delete_id):
    article_to_delete = Posts.query.filter_by(id=delete_id).first()

    if current_user.username == article_to_delete.author:
        db.session.delete(article_to_delete)
        db.session.commit()
        flash("Your article has successfully been deleted!", category='success')
        return redirect(url_for('home_page'))
    else:
        flash('Something went wrong lease try agan later', category='danger')
We have completed this project by designing our blog site and adding all desired features with clean code. Congrats! But there is one more thing...
Finishing Touches
It is recommended practice to use a requirements.txt file to store all the packages we have installed in this application:
pip freeze > requirements.txt
This file can then be accessed by anybody who wants to use our webapp, as they can install all our packages directly with one command:
pip install -r requirements.txt
And we are done! Our blog is ready for its many users and articles. Time to test it.
Taste the Magic
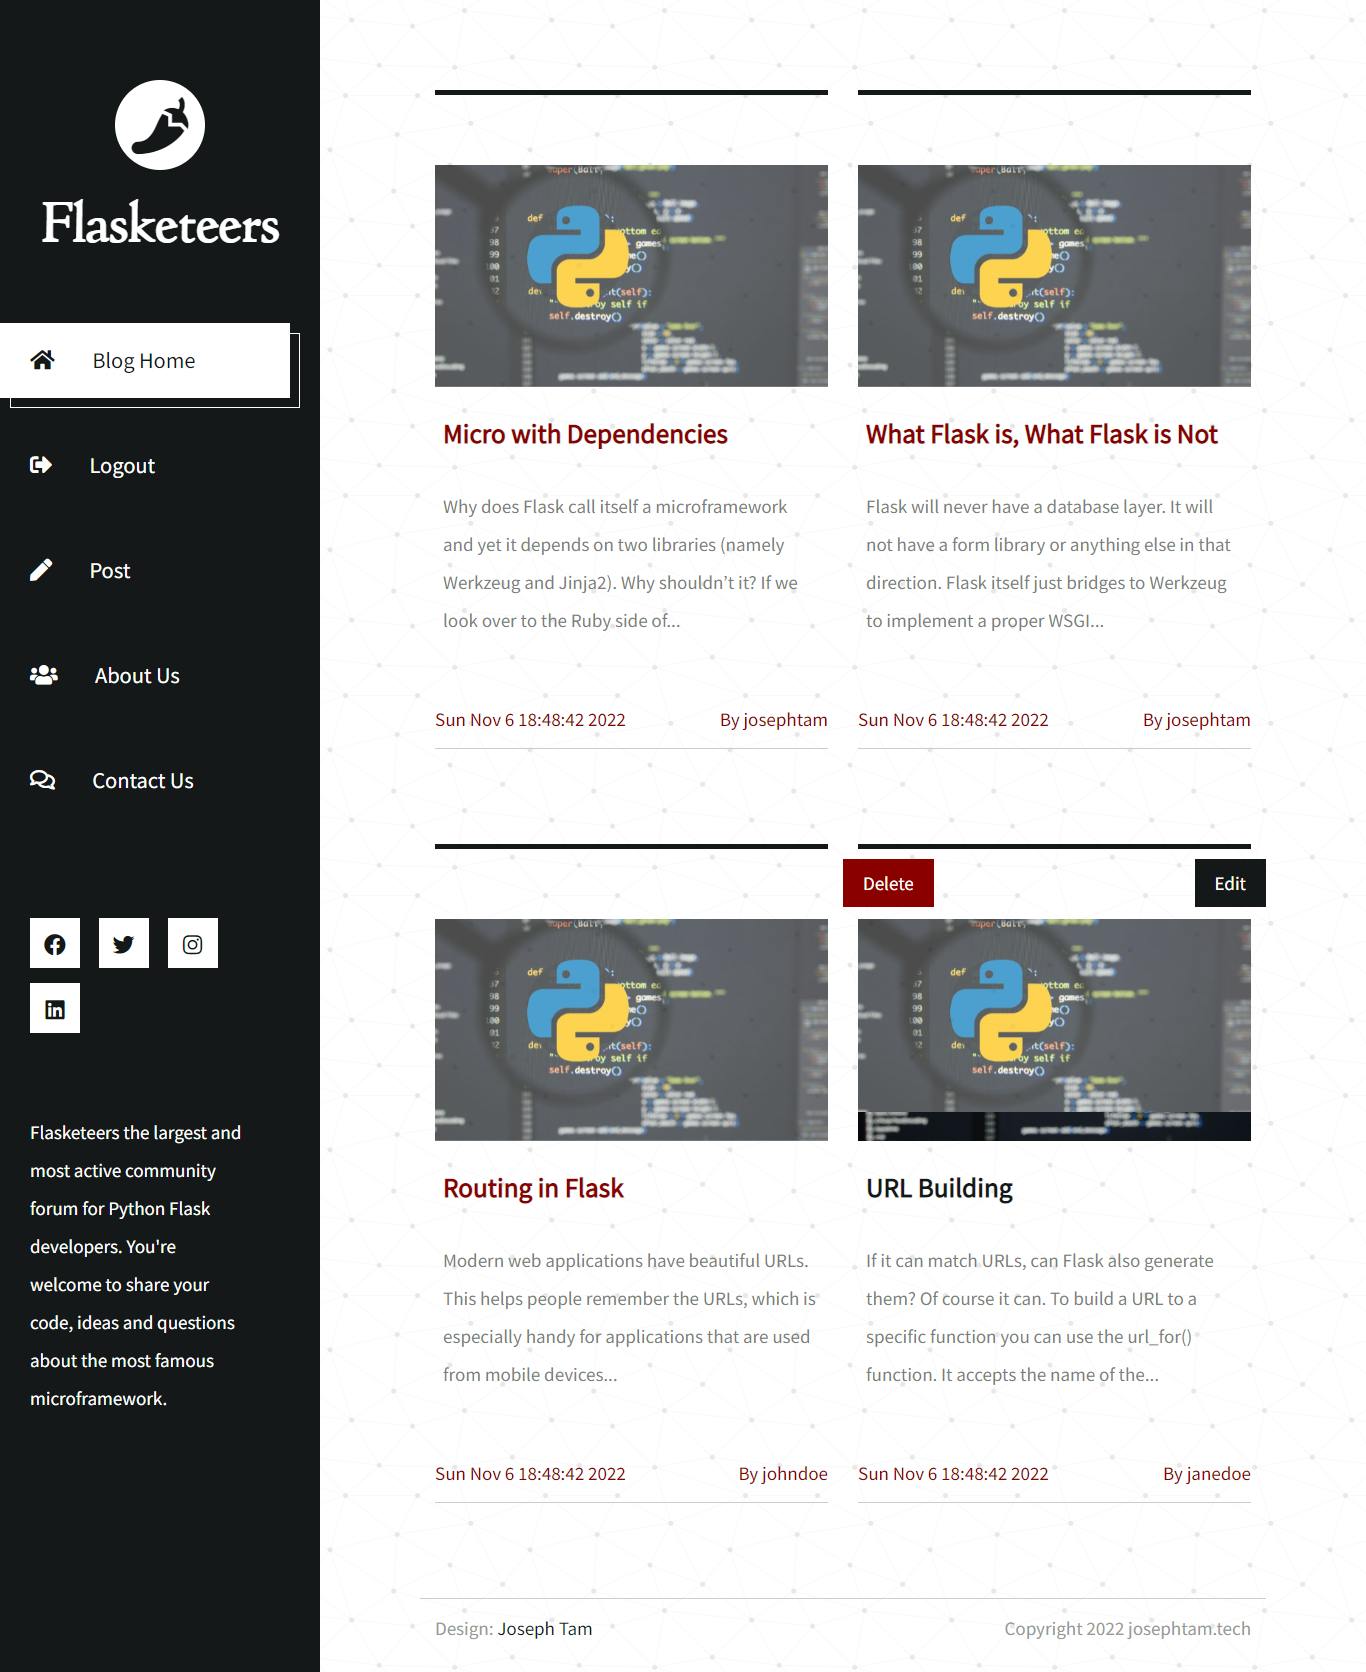
Let us see what we have created. This is done via flask run in the terminal, from where we will open the generated link on a browser. Here is an example of how Flasketeer Blog looks after a Sample User logs in:
To terminate the Flask process and return to the normal CLI, click Ctrl C on any OS. Remember to deactivate this project's virtual environment when done with it.
Conclusion
I appreciate you joining me as I discover the elegant simplicity of Flask!
We learned how to build up a Flask environment in Visual Studio Code, use Jinja to edit HTML templates, and use SQLite and SQLAlchemy to execute CRUD operations on databases. Additionally, we have practiced routing, using Werkzeug to hash passwords, message flashing, internet security, user authentication, and user authorisation.
Please forward this guide to other web development enthusiasts, especially those with a passion for Python Flask Backend Software Engineering.
Check out Flasketeer Blog, a project I created for the second semester test at AltSchool Africa utilizing these ideas.
Credits
Caleb's Flask lessons at AltSchool Africa's School of Engineering. See more lessons from him in my AltSchool Python repository
Abdelhadi's Flask and Flask-SQLAlchemy tutorials on Digital Ocean
The Art of Routing in Flask, by Todd Birchard